/f/92524/1200x630/c774edc98b/lamborghini-configurator.webp)
Hello, I’m Michele Farina, Automotive Designer and Grasshopper Specialist at ShapeDiver.
In this blog post I will teach you how to push the boundaries of the ShapeDiver viewer in order to achieve high quality rendering results. I will unveil some tricks that allow to create a more realistic configurator and improve the user experience of your clients without compromising performance.
Hold on to your door handle and get ready to race through these 5 things I learned while creating this Lamborghini configurator with Grasshopper and ShapeDiver!

1. OPTIMIZING With Booleans & Attached Transformations
This Lamborghini is made of several parts of a very different nature:
The body of the car is mostly a static design that can be designed in any 3D design software (Maya, Blender, etc…) and exported as low poly meshes that can be internalized in the Grasshopper definition. Then there are two distinct parametric parts of the car: the rims and the grille. Those are created from scratch in Grasshopper.
The first way to optimize your definition is using booleans to break the computation of some parts of the script when it’s not used.
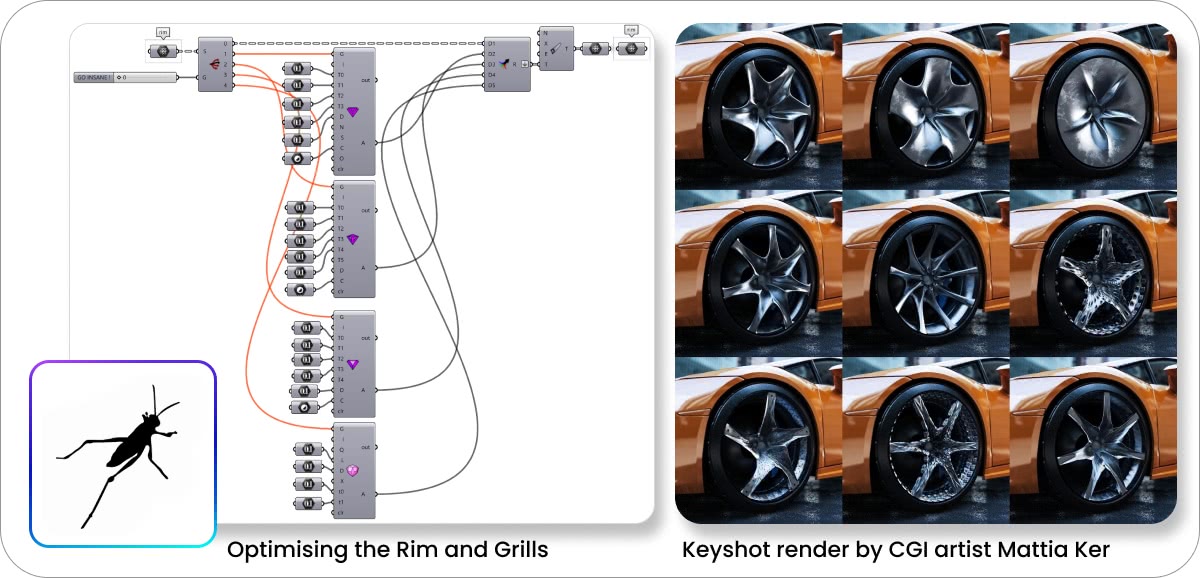
All these wheel variations above are built in low poly through Kangaroo. If refinement is needed, a toggle connected to Weaverbird ’s Catmull-Clark component would smooth them.
Also, the GO INSANE! parameter uses a value list that works as a toggle enabling and disabling some Mesh+ components to create fancy surface refinements for the rims.
Remember that there is a hard WebGL limit of 64k vertices per mesh (16 bits), so every branch of all ShapeDiverDisplayGeometry components should not exceed that limit. One should also pay attention to the total number of vertices for all meshes in the scene, but limitations will mainly depend on the GPU of the device being used.
The second way to optimize your script is to reduce the number of meshes generated in the Grasshopper model, and thus reducing both its computation time and the download time of updates for the online ShapeDiver model.
This is relevant in particular if the same geometry is reproduced several times across the definition. A key component in that case is a C# script we developed at ShapeDiver: the XFormGeo component (you can download it here ). The C# script works similar to the native Grasshopper Transform component, but it attaches some transformations to the original mesh without creating new meshes.
We are tricking the ShapeDiverDisplayGeometry , giving it a mesh and transformation, saving many vertices and usually a bit of computation time. Check the comparison between the Transform and C# script methods:
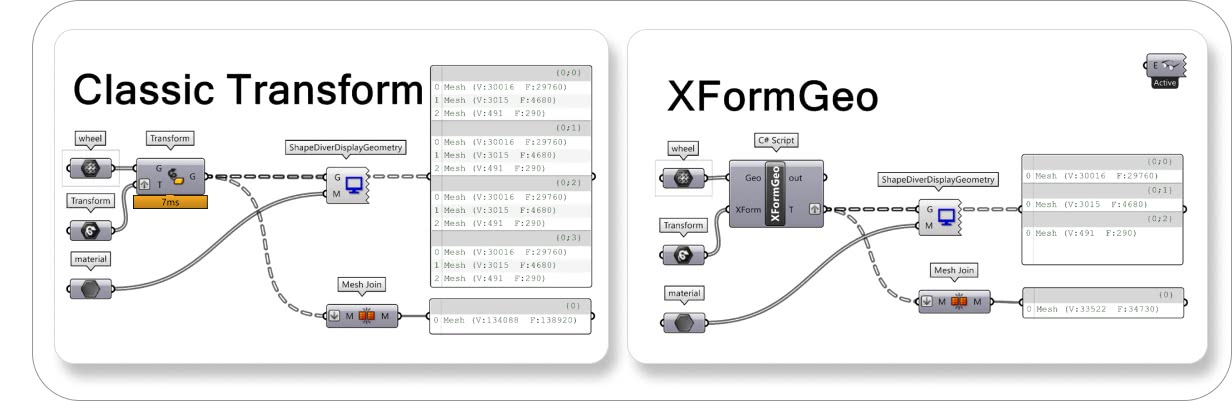
Using the Transform method (above), the operation takes about 7ms of computation time locally. If the tree of meshes is flattened and joined together, we end up with a mesh of more than 134k vertices. Using the XFormGeo component, first of all, the operation is so fast that the Profile (GH > Display > Canvas Widget > Profiler) does not show anything, and we end up with 33k vertices. In Grasshopper, it’s seen as the single wheel but we are telling the ShapeDiver viewer that we want to display four wheels (33.5k x 4 = 134k vertices). Be aware that the XFormGeo component will attach a series of transformations where the final geometry will be displayed. If you want to display the geometry in its original position, make sure to attach the identity transformation (for example using the identity matrix component or the Scale transformation with factor 1).
As an example, I only internalized one side of the body of the car in the definition, and I am attaching both the identity transformation to visualize its original position and the mirror transformation to visualize the other half.

2. SIMPLIFY Your Parameters
As a basic rule, before uploading a model to ShapeDiver, it's a good idea to review all your sliders and only keep the ones that we want to expose to the users.
For example, some trimming details of black plastic or rubber in a car are usually not configurable or not so interesting to configure; so in this case, as you can see below, I've just internalized the values in the right primitive.
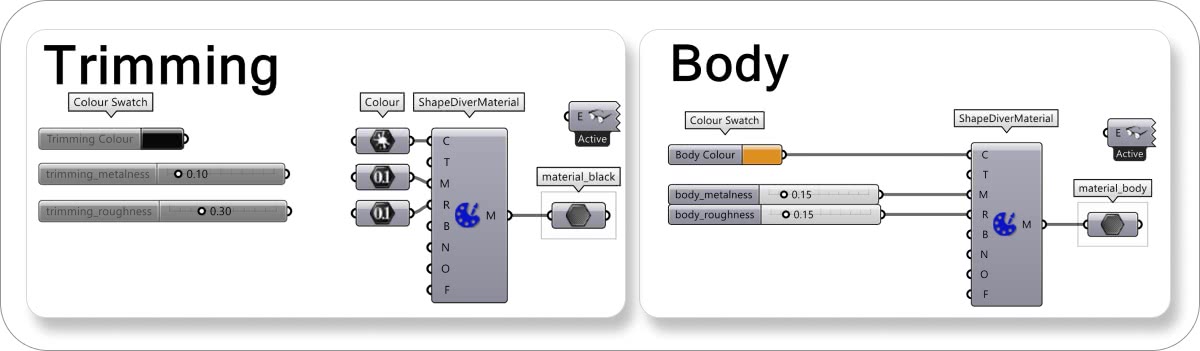
Everything that is disabled won’t be seen in ShapeDiver, so I kept the Trimming Colour swatch, and the metalness/roughness sliders disabled nearby, just in case I want to change something in Grasshopper. You can use panels, instead of sliders, if you want to see the values and maybe modify them while modeling, but you don't want them visualized in ShapeDiver's interface.
In some specific cases, you would need to keep the sliders even if users won't be able to use them in the configurator (just hide them before applying settings when uploading).
For example, I want to let my users change the color of the Lamborghini’s body frame. Still, I'm not interested in having the metalness and the roughness of the bodywork being configurable.
What I did was to keep these values as sliders to test them during Edit Mode before publishing. Indeed, it is sometimes easier to play with material parameters directly in the online viewer in order to achieve the exact look we want. Once I achieved the desired results, I hid them by simply clicking the “crossed circle button” on the top right corner of each parameter when setting the model up on ShapeDiver.
3. REALISM Is In The Shadows
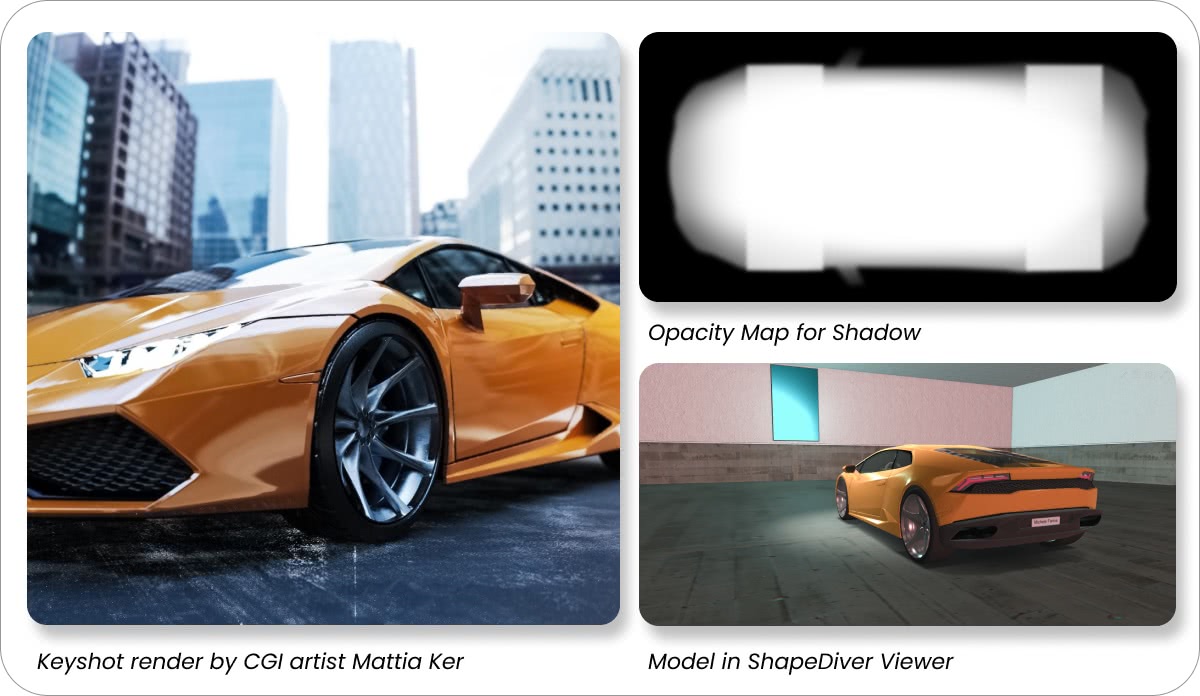
As you can see in this render above (made in Keyshot by Mattia Ker ), one of the secrets to having a highly realistic result both in rendering and in our configurator is for the object to cast a shadow on the ground. To have a more realistic shadow, I created a special opacity map using Photoshop.
My process was: screenshotting the top view of the Lamborghini, then with the Pen tool in Photoshop creating the car's outline (with side mirrors included). In the opacity map’s logic, pure white in color, pure black is transparent, grey is the gradient between them. It's important to remember that the farther the object is from the ground, the blurrier the shadow is (side mirrors, for example).
Once the opacity map is ready, implementing the Grasshopper part is pretty straightforward.
As you can see below, you can create the base shadow rectangle by the bounding box of the car. I suggest moving this rectangle a little bit above the ground level to avoid overlapping effects in the viewer.
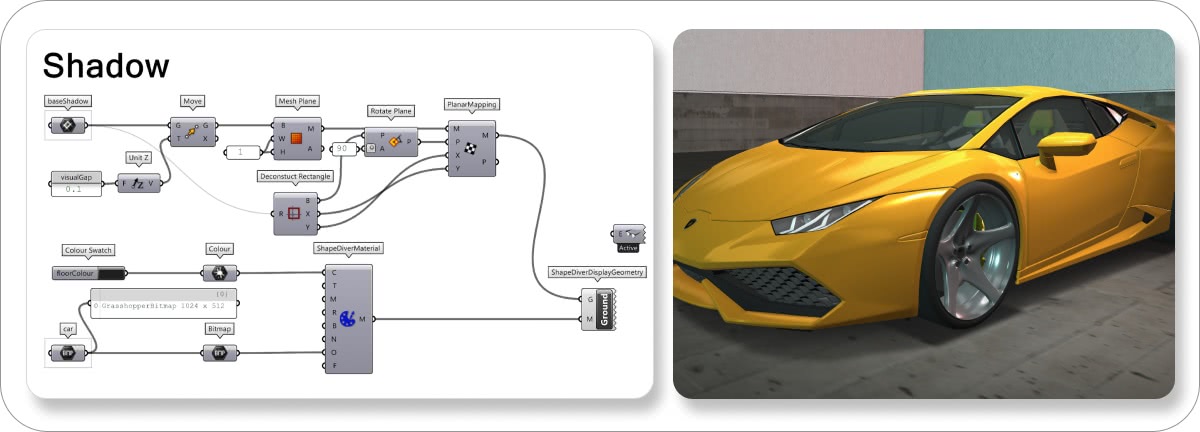
The third step is meshing and texture-mapping the mesh ( Human component supported by ShapeDiver). The last step is displaying the mesh with a ShapeDiverMaterial component.
As you can see, I've kept the floor color swatch to see ShapeDiver's environment with the correct intensity of darkness. The car opacity map internalized in a bitmap is connected to the Opacity input of the ShapeDiver Material component.
The last things you need to care about are the dimensions of the bitmap, which should be in the power of 2 . In our case, 1024x512 is also good.
4. ENVIRONMENT & Lights
Creating a pleasant environment around your object can help a lot in making your configurator look good. Usually, backgrounds don't take too much time to model and have few vertices so they don't impact the configurator's performance.
Moreover, having different maps (texture, metalness, roughness, bump, normal, and opacity) adds a new layer of realism to the configurator's final result.
As you can see below, I internalized the base color of the environment and the maps T M R N inputs. The string is only a link to the texture I want to use. With the ShapeDiverTextInput's components on the left, you can also have the possibility to let the user upload the surface while configuring the object. Or they could be helpful (that's what I've used them for) to test more textures directly in ShapeDiver’s viewer and check the results.
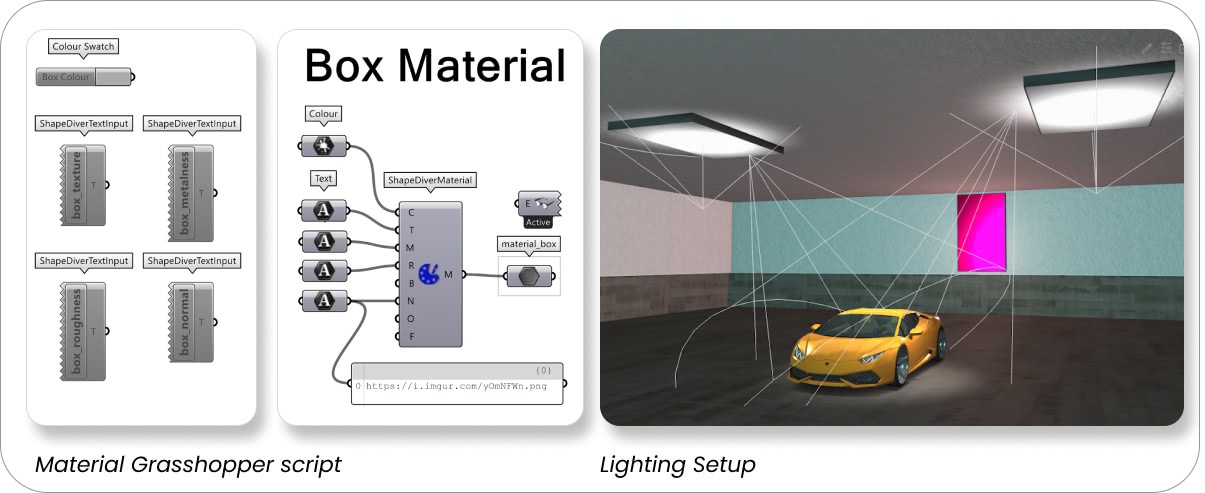
Remember to “ texture map ” the meshes (using the Human plugin) when you want to have complex materials like the above. We have a complete video tutorial on this here.
Bear in mind that so far, we cannot have emissive materials in our current ShapeDiver viewer, but it's possible to create some suggestive results with some tricks.
You can see my lighting setup in the image above:
I have four visible types of lights (plus 1 you cannot see: the hemisphere light).
- I have one main light in the top right of the viewer, which is a Spot Light, and it strongly points to the focus on the car, the wheel area.
- I have another background light in the opposite corner but less intense than the main light.
- Moreover, you can see two cones pointing down near the ceiling. The light is actually pointing up at these two lamps on the roof; they are both Spot Lights with Intensity 1 and Decay 0.
- Finally, there are two Point Lights in front of the pink and, on the opposite side, ciano lamps. I've used the Point Lights because I wanted that the lamps on the wall seem emissive (as the ceiling ones) and because I wanted some colored filling lights in the environment.
To set the lights in the ShapeDiver environment, we need to know the exact coordinates where they will be located. These coordinates can be obtained in the Grasshopper model and input manually in the lighting settings.
You can use the ShapeDiverDataOutput component and connect the data directly to the light position via the API. Additionally, the lighting settings allow saving different lighting scenes that can be reused in any other uploaded model by copying the model settings in the upload process.
5. CUSTOMIZE With Decals Or Similar
Last but not least, a personal touch! Using this method below, you’ll be able to create any customization in the shape of decals, stickers or similar to your geometries, in my case the plate. We can achieve this by using the “Squid ShapeDiver Edition”, which is bundled with our ShapeDiver plugin.
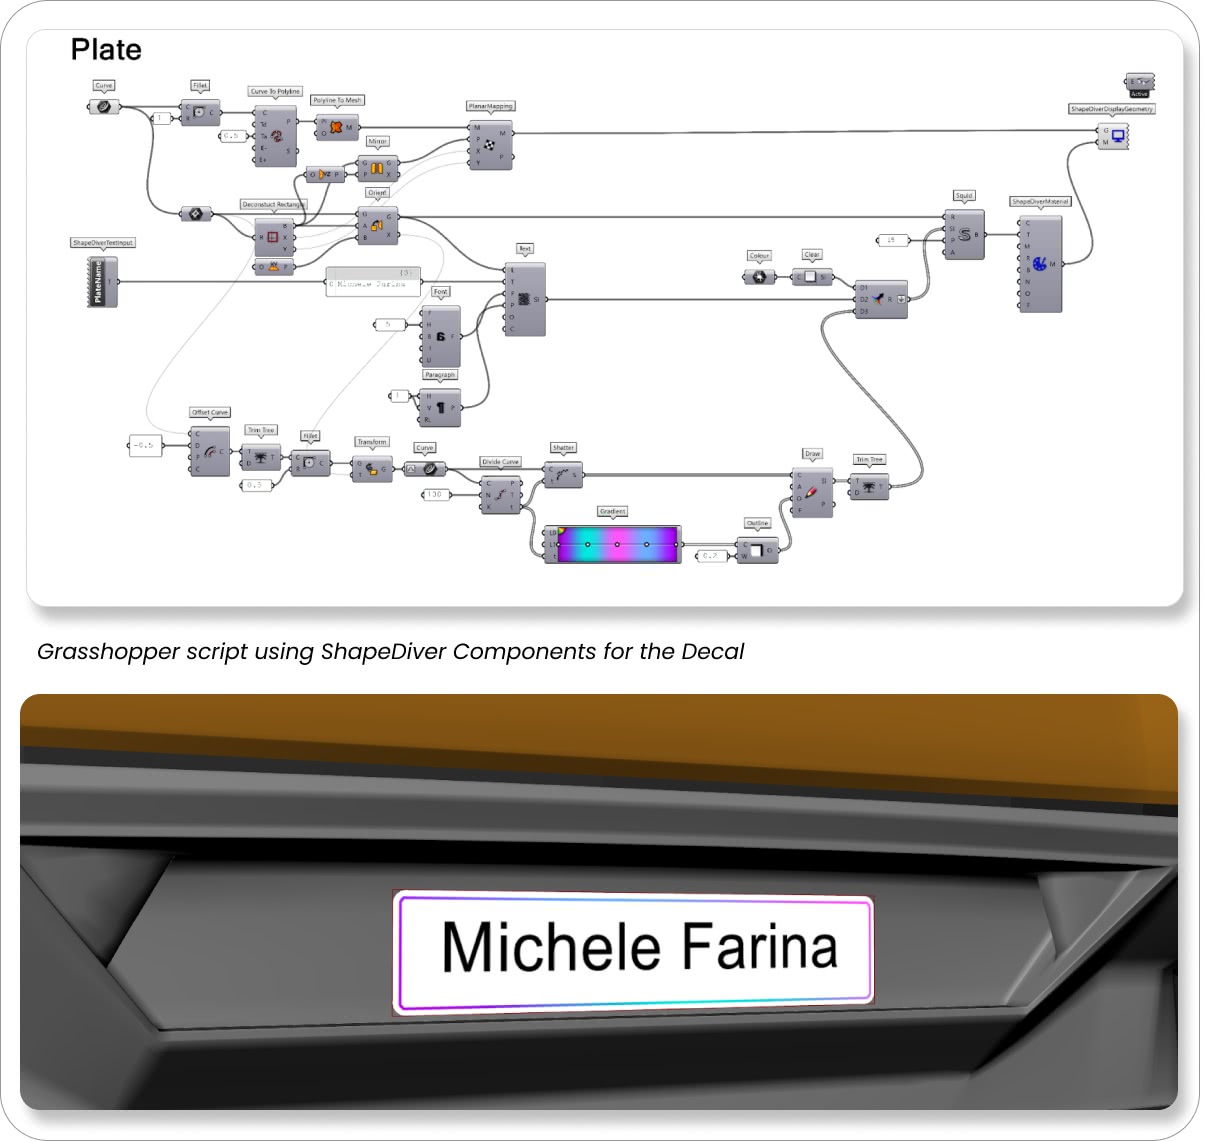
Download the GH file of the plate.
I created a rectangle outline in the position where I wanted my decal. I transformed it into a planar mesh, and after I've mapped it (with PlanarMapping from Human plugin) with the exact dimensions and plane of the rectangle. In parallel, I played down the rectangle in XY plane, and I started preparing the SI (Squid Instruction). Squid Instructions are inputted in the Squid component, which creates a bitmap. This bitmap is inputted in the T (texture) input of our ShapeDiverMaterial component, which goes into the ShapeDiverDisplayGeometry .
Actually, there were 3 Squid Instructions:
- 1. With the Clear component, I've painted the rectangle white;
- I created the text with the Text component, using the ShapeDiverTextInput component previously to allow the user to add his name;
- I made an offset curve of the rectangle, divided it into small parts, assigned a color to each piece (NB the Gradient component won't be available in ShapeDiver's User Interface), and painted this curve with the Outline component and Draw component.
Conclusion
We know that first impressions tend to last. I hope this tutorial helps you understand how to make the most out of the ShapeDiver viewer so whatever project you’re working on, it can look its best on the web.
When in doubt, please post your question on Forum, and our development team will be able to help.
Do you have a feature request? Let us know .
Best, Michele Farina.
And a special thanks to CGI artist Mattia Ker: https://www.instagram.com/mattia_ker/
