/f/92524/1423x870/94ab0614d9/1.webp)
Introduction
In this ShapeDiver blog post, Grasshopper expert Edwin Hernández explains how to enhance the rendering of 3D models in Grasshopper by properly applying texture mapping. He discusses common rendering issues, the importance of converting geometry to meshes for better performance, and techniques for applying textures using the ShapeDiverTextureTransform component or the Human plugin.
Edwin also covers different texture mapping patterns (planar, cubic, cylindrical, spherical) and transformations (move, rotate, scale) to achieve realistic material effects, such as color, metalness, roughness, and bump maps, ultimately improving the visual quality of models on the ShapeDiver platform.
Hi, my name is Edwin. I'm a Grasshopper expert at ShapeDiver, and in this blog post, I will show you how to enhance the rendering of your Grasshopper definitions by properly mapping textures onto your geometry and applying some attractive materials. Let's dive in!
One of the most common issues I've seen Grasshopper users encounter when uploading their definitions to ShapeDiver.com is "poor" rendering of their models. Great online rendering depends on several factors and two of the main ones are:
1. The online viewer used to display the 3D files (we've made some great improvements on ours since we first launched our website back in 2016, and we'll discuss this in a future post).
2. A proper setup of the 3D file itself. The main problem is that, on average, Grasshopper users excel at solving geometry problems, investing significant time into making definitions run as efficiently as possible. However, when it comes to how the models actually look... well, let's say that this part also deserves some attention. This is understandable, given that Grasshopper itself hasn't been widely used as a presentation tool, but with ShapeDiver.com, we're trying to change this.
First Impressions Last
Let's start with the way we present our models online. Compare these two sofa setups:
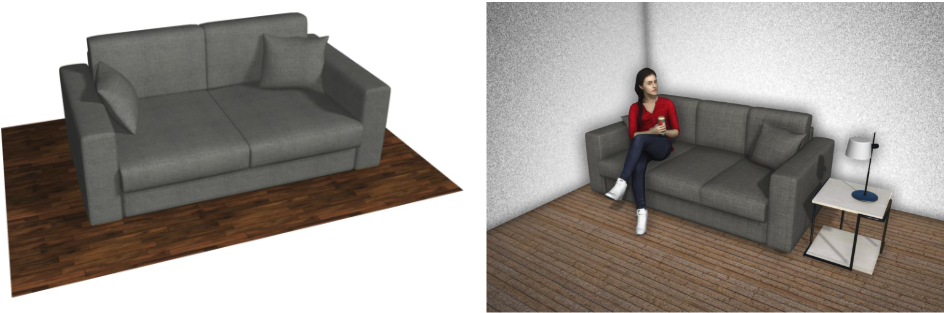
*Sources: sofa left , sofa right .
Technically, both are the same sofa. You can change exactly the same parameters on both, but... which one was more pleasant to look at and interact with? And most importantly: which one felt better?
In this case, it depends not only on having great textures but also on putting some extra thought and adding interesting scenery to transform something as "regular" as a sofa into something a bit more visually appealing.
Why Is It Important To Make Your Models Look Good?
Let's jump now to our main topic. When uploading your Grasshopper definitions to ShapeDiver.com, potentially anyone around the world will be able to check them out (if you set the model to public, that is), and to catch your users’ attention, first impressions should last. After all, there's only so much you can do through a device's screen, so you should use all the tools at your disposal.
Additionally, if you're planning to use your ShapeDiver model commercially, a good setup will make the experience more pleasant for your end users.
What is Texture Mapping?
Let's start by defining what "Texture Mapping" is. If you've previously worked with 3D modeling (or modelling, depending on where you're reading us from) and animation software such as Blender, Maya, 3Ds Max, or others, these concepts may already be clear to you, but let's assume they're not.
Texture Mapping is the application of coordinates to your 3D geometry using different patterns to enhance the realism of the object. These patterns can be planar, cubic, cylindrical, spherical, or completely random; you're even free to create your own custom patterns.
How Can Texture Mapping Be Achieved in Grasshopper?
There are two main ways we recommend to achieve this:
1. By using the ShapeDiver component "ShapeDiverTextureTransform" found in our plugin (if you haven't downloaded it from our Food4Rhino page, we recommend you to do so!).
2. By using the popular Grasshopper plugin Human for which on ShapeDiver we currently only support the texture mapping components marked in the image below:

*Texture Mapping with the Human plugin.
Let's start with our "ShapeDiverTextureTransform" component. As its name suggests, it was created to transform the texture mapping of a geometry. It will work wonderfully if the geometry has a pattern applied to it. This will be the case if you have used certain Grasshopper components to create them, which contain the native texture mapping effect that you want to achieve.
However, if you've altered your definition excessively, you may have unintentionally destroyed the native texture mapping, in which case you'll need to reconstruct your pattern using the mentioned Human plugin.
How Can You Know If Your Geometry Has A Correct Texture Pattern?
The easiest way to figure this out is to connect the element you need to render into the "ShapeDiverDisplayGeometry" component and give it a texture using the "ShapeDiverMaterial" component.
If you don't know how to add a texture image yet (something that we will show you further down in this post), simply copy and paste this link: https://i.imgur.com/V0uyKnM.png, which contains a texture checker, and connect it to the "Texture" input. By the end, you should be getting something like this:
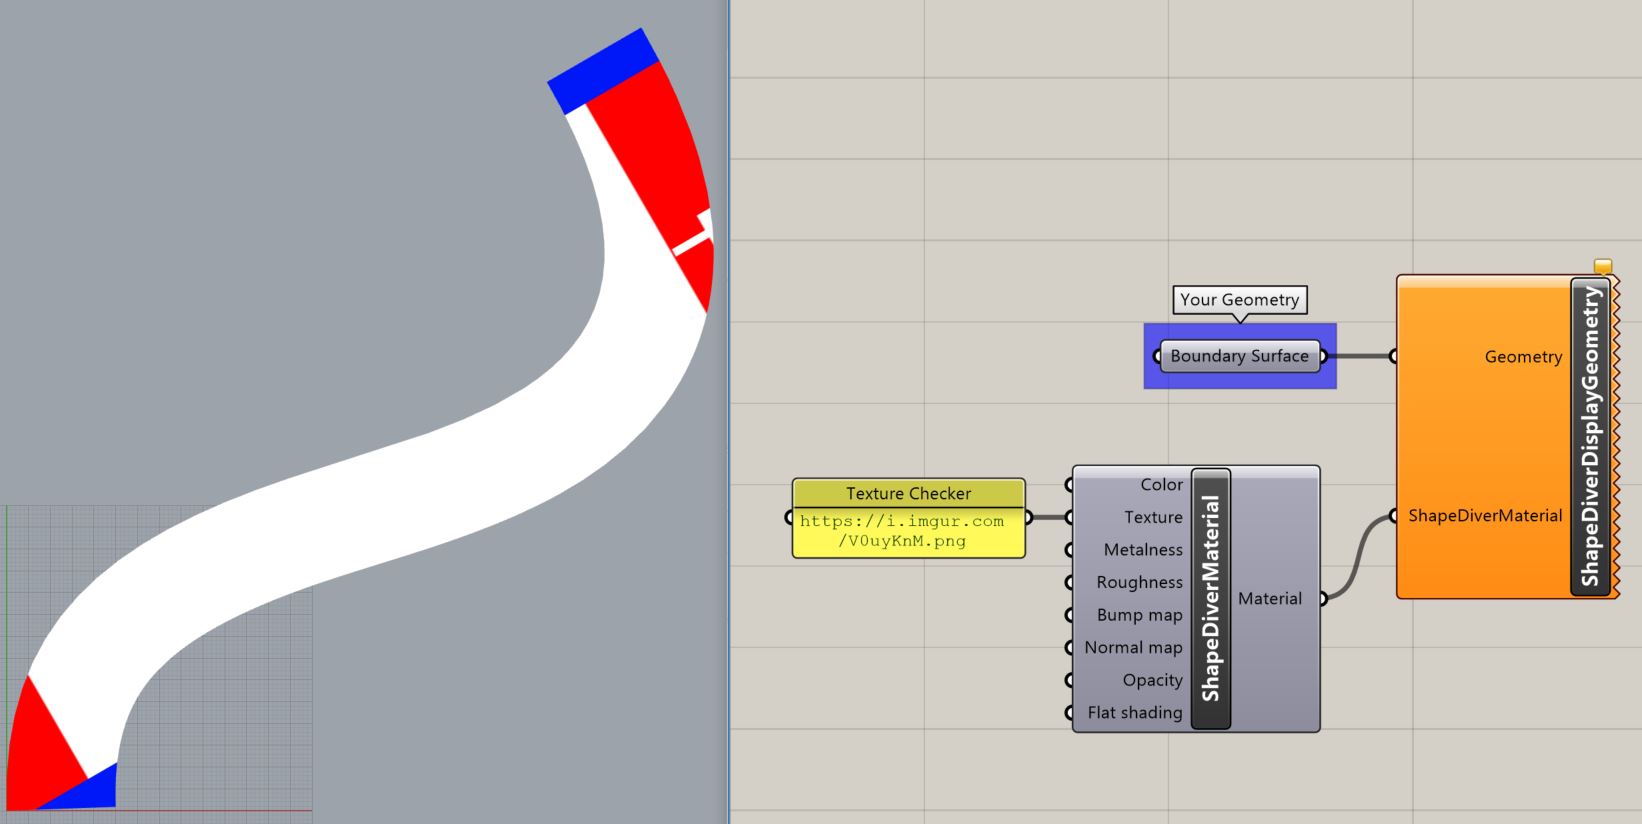
*Texture applied to a surface created with the "BoundarySurface" component.
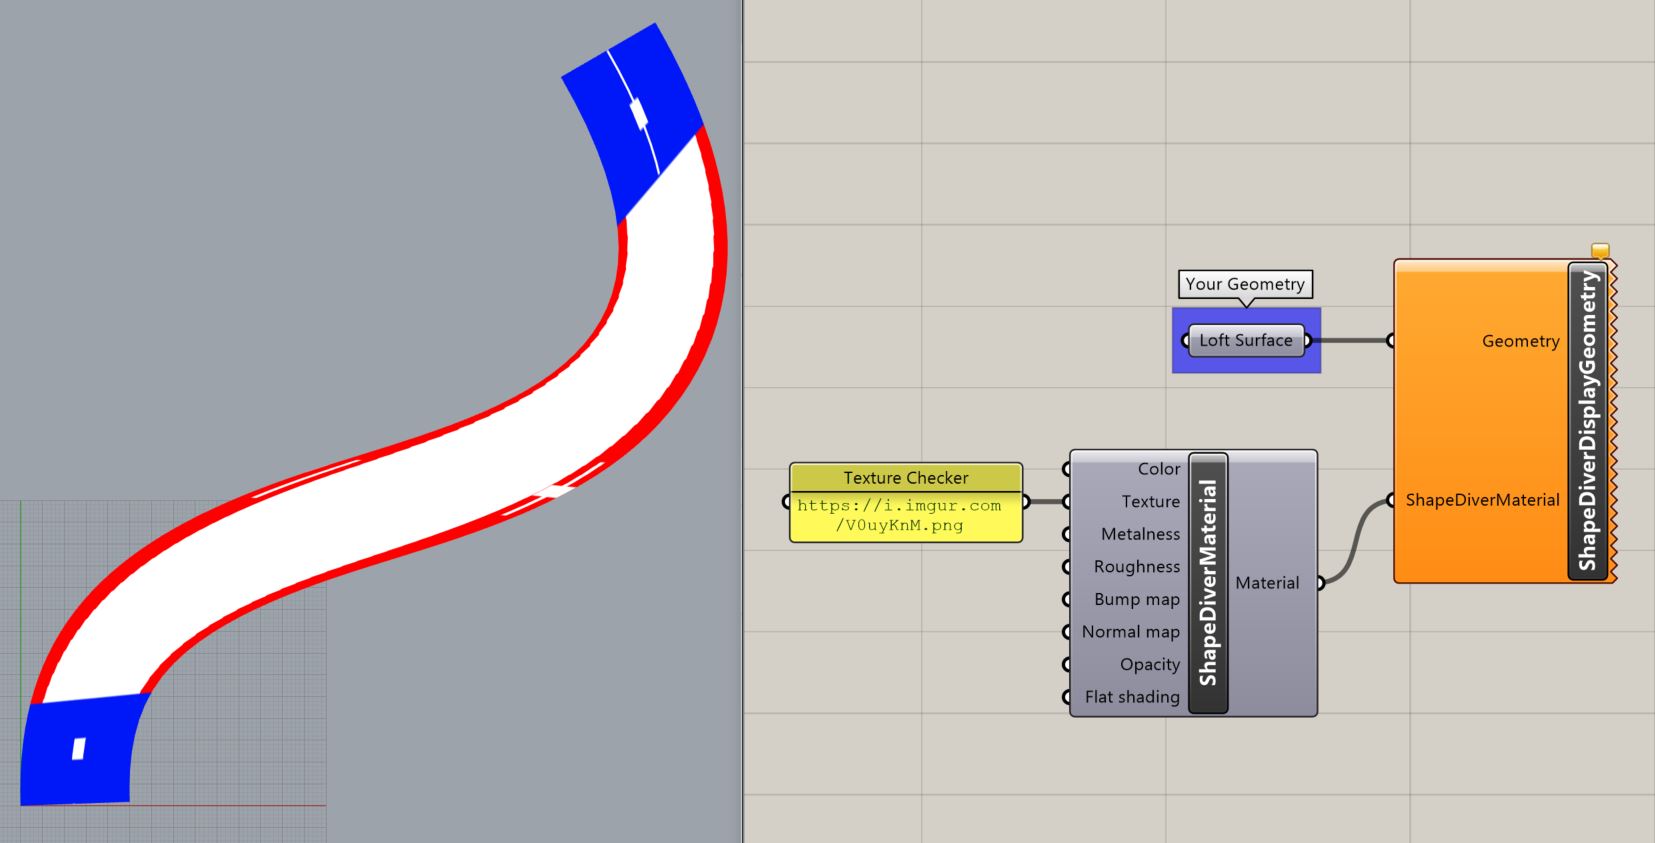
*Texture applied to a surface created with the "Loft" component.
As you can see, the first surface created with the "BoundarySurface" component has texture coordinates based on a plane that covers the boundary box of the geometry, whereas the second surface created with the "Loft" component has texture coordinates that follow the shape of the given element. Other components that create texture coordinates similar to those achieved with "Loft" are the "Sweep" and "RuledSurface" components.
Tip: Primitive objects also have their own texture coordinates.
Interestingly, the only primitive object that doesn't have a well-set texture map is the box. However, this can be solved by converting it into a mesh using the "MeshBox" component. In any case, it is recommended to always convert the final geometry into meshes to improve the performance of your definition (but we'll talk about this specific topic in another blog post). Converting to a mesh will preserve the texture coordinates of the primitive.
Finally, after you have ensured that your geometry has a good pattern, you can start playing with it by using transformations. The majority of these transformations can be found in the outputs of components, which are located in the "Transform" tab inside "Affine", "Array", and "Euclidean."
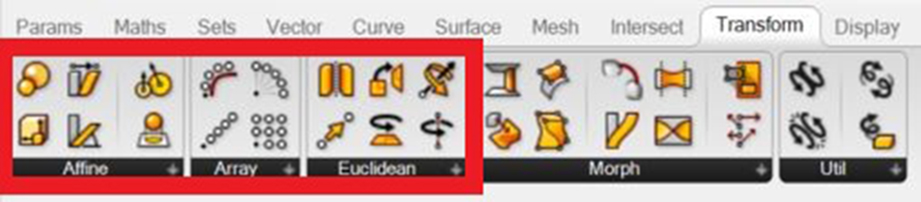
The simplest and most used transformations for Texture Mapping are "Move", "Rotate", and "Scale", and they can be combined by using the "Compound" component. Just create a list with those transformations in the order you'd like them to be executed and connect the "Compound" component into the "Transform" input located in "ShapeDiverTextureTransform" as shown in the following image:
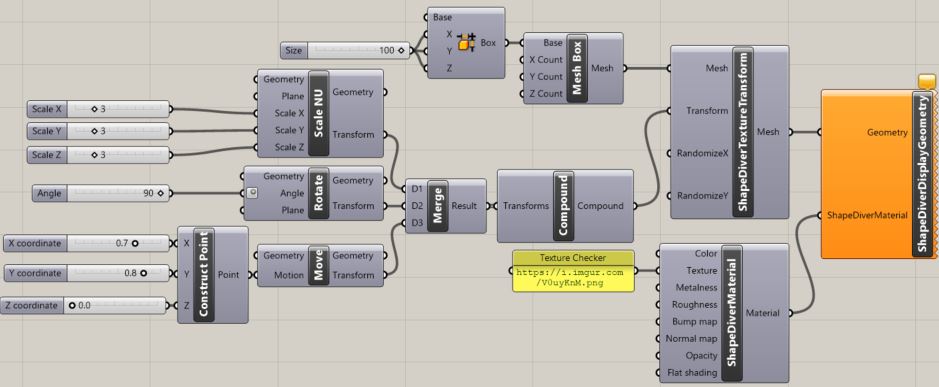
If done correctly, you'll be able to achieve something like this:
Additionally, "ShapeDiverTextureTransform" allows you to randomize the texture in the X and Y axes if you don't want a symmetrical result.
What If The Geometry Doesn't Already Have The Texture Pattern I Want?
Don't worry! It's time to explore the second option: let's check how to create one from scratch using the Human plugin.
Let's say we have an asymmetrical shape created with the "Loft" component, which means it has a texture map that follows the shape of the geometry as we explained before, but we want the pattern to be symmetrical and aligned with the XY plane.
To achieve this, we need to use the "PlanarMapping" component available in Human. This component will reconstruct the texture coordinates of our geometry based on a plane and given domains in the X and Y axes.
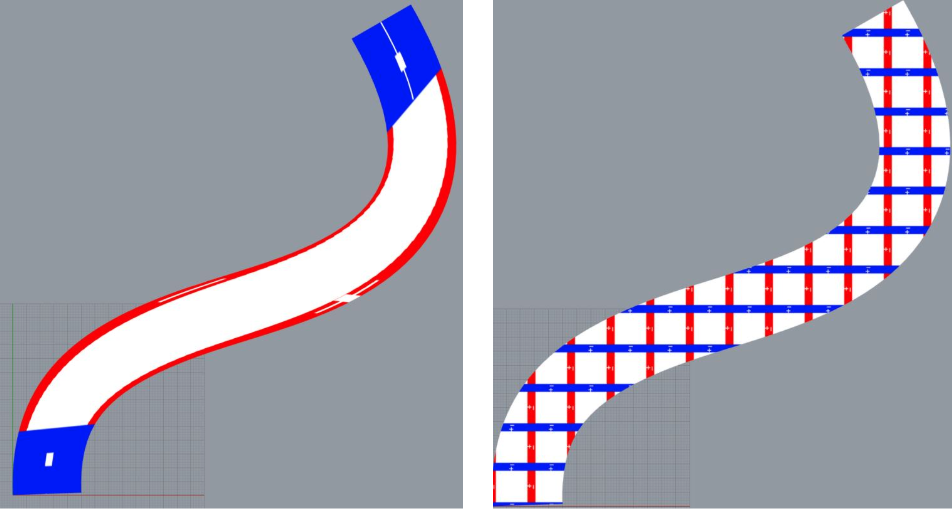
*Before and After Planar Mapping
As in the previous example, you can use other primitive shapes to project textures on your geometry and achieve different effects.

*Source: http://www.rafaelservantez.com/writing/tutorials/3d/projection_types.jpg
Now that we have our geometry with the desired texture coordinates, what is the next step? Well, the next step is to find (or create) suitable materials for your model!
Creating Materials
ShapeDiver has two components used to apply materials:
"ShapeDiverSimpleMaterial" and "ShapeDiverMaterial". Let's start with the former.
1. "ShapeDiverSimpleMaterial"
This is ideal when you want to add a color or use one of our preset texture codes. These codes already include all the necessary settings to display great materials via our viewer:
Live Material Demo
The following material codes can be input in the text fields above:
- Plastic: type code 0200
- Metal: type any of the following codes 0300, 0301 or 0303
- Gold: type any of the following codes 0310 or 0311
- Glass: type code 0400
- Wood: type any of the following codes 0500, 0501, 0510 or 0511
- Leather: type any of the following codes 0600, 0601, 0602 or 0603
- Fabric: type any of the following codes 0700 or 0701
You'll need to take into account that you won't be able to visualize these textures in the Rhino viewer. They'll only be visible via our viewer once you upload your definition to ShapeDiver.com.
Additionally, if you want to play with the preset textures, the color that you set in the "SimpleMaterial" component will multiply the texture. What this means is that the color will blend with the given material letting you obtain different effects like in this configurator.
2. "ShapeDiverMaterial"
You'll need this component if you want to create materials from scratch. This component has different input parameters:
a. Color: It also multiplies the texture image as "ShapeDiverSimpleMaterial" does.
b. Texture Map: It contains a URL image with the base colors of the material.
c. Metalness Map: It defines how much the material appears like metal. It accepts values from 0 (no metal) to 1 (very metal \m/). It also accepts a URL grayscale image where the lighter the grey is, the more metallic the material looks like.
d. Roughness Map:
It defines how rough the material appears. It accepts values from 0 (smooth) to 1 (rough). It also accepts a URL grayscale image where the lighter the grey, the rougher the material looks like.
e. Bump Map: It defines the depth that is perceived in relation to the light. It accepts a URL grayscale where the darker the grey is, the deeper the material looks like.
f. Normal Map: It is similar to the bump map but creates a better effect as it affects the surface normals of pixel fragments by using the values of an RGB image stored in a URL.
g. Opacity: It indicates how transparent a material is. It accepts values from 0 (fully transparent) to 1 (fully opaque). It also accepts a URL grayscale image, called Alpha Map, where the lighter the grey is, the more opaque the material looks.
The majority of these parameters accept URL links that contain the image map with the desired effect. However...
Where Can I Find Good Images For My Materials?
The best websites I can recommend are textures.com, poliigon.com and texturehaven.com. Additionally, if you already have a texture image ready to use, you can create its normal map at: http://cpetry.github.io/NormalMap-Online/.
However, you can just do a simple Google search with the name of the material you're looking for, the kind of image map/effect you need, and finally, you need to make sure your image is seamless.
Why Do I Need A Seamless Material?
When a texture is applied to a 3D model, it needs to repeat itself throughout the entire geometry so that it gets completely covered. If the images you are using are not seamless, it will be very clear where each image connects with the next one, meaning it won't look natural. This brings down the realism of your model. Just compare these two examples below:
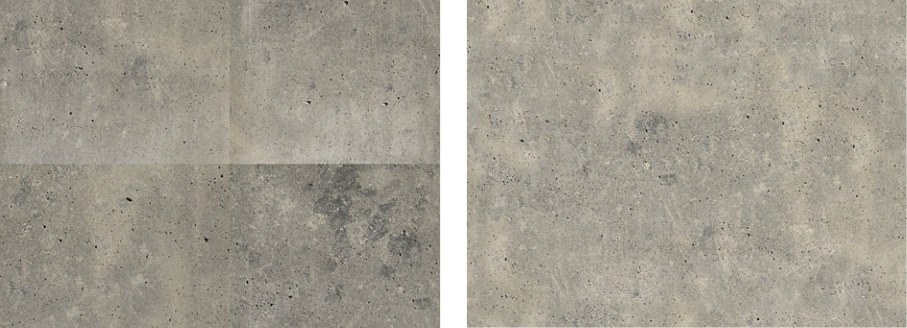
*Source: http://www.davidhier.co.uk/Tutorials/concrete2.html
If you find the image you need but it is not seamless, you can make it seamless by using various tools, such as Photoshop. Simply search on YouTube, and you'll discover numerous tutorials on this topic.
In addition to achieving a seamless texture, your image must adhere to the "Power Of Two" rule. This means that the width and height should be able to be doubled or halved by 2. In other words, any image that is 8, 16, 32, 64, 128, 256, 512, 1024, 2048 (or higher, but not recommended) pixels in one or both dimensions is considered valid and properly optimized for quick loading.
If the image you use is not "Power Of Two," it will be resized, which will extend loading time. To learn more about this rule, visit this link.
Finally, it is essential to optimize your images. The easiest and fastest way to optimize textures is to visit www.imagecompressor.com or www.guetzli.it. Here you can upload any image and play with the quality. Remember, if your material is applied to a piece of your definition which is too small or barely seen, the quality of the image doesn’t need to be the best. We’re almost done here…
Where Can I Get The URL Link That Contains The Image Map/Effect?
All the URLs you use in ShapeDiver components have to be publicly accessible, otherwise our viewer won't be able to read the files.
If you don't have your own servers where you can store your data and then grant public access, my best recommendation is to upload your images to https://imgur.com/upload and then get the link by right-clicking the uploaded image and copying the image address.
Now that we have the links, we can add them to "ShapeDiverMaterial" and get cool effects like this one:
Live Final Texture Mapping Demo
*This material was achieved with the image maps/effects here .
Conclusions
Going the extra mile while setting up your models is a great way to ensure long-lasting first impressions. Internet users want to be charmed, "convinced through their eyes" if you will. With so much online competition nowadays and the fact that we live in the age of immediate gratification, it takes a bit more dedication to wow your audience. Great Texture Mapping is just one of the many ways in which you can separate your products from the bunch.
Was this tutorial helpful? Do you have any comments or feedback? Make sure to visit our Forum and start a thread with your doubts! We're always checking for new topics from our users so we'll make sure to give you useful answers.

/f/92524/1423x870/57509317a7/3.webp)